Azure Key Vault 和 Azure Functions 是什么?
Azure Key Vault 是一个用于安全地存储和访问机密的工具。 机密是你希望严格控制对其的访问的任何东西,例如 API 密钥、密码或证书。 保管库是机密的逻辑组。
Azure Functions 允许你运行小段代码(称为“函数”)且不需要担心应用程序基础结构。 借助 Azure Functions,云基础结构可以提供应用程序保持规模化运行所需的所有最新状态的服务器。
函数由特定类型的事件“触发”。 支持的触发器包括对数据更改做出响应、对消息做出响应、按计划运行,或者生成 HTTP 请求的结果。
虽然你始终可以直接针对大量服务编写代码,但使用绑定可以简化与其他服务的集成。 使用绑定,你能够以声明方式访问各种 Azure 服务和第三方服务。

首先来阐述下我们的应用场景:
假如你需要使用Azure function 来定时调用第三方的接口,而第三方的接口又正好需要使用证书(仅包含公钥,即 .cer 文件而不是 .pfx文件)去验证,该怎么做呢?
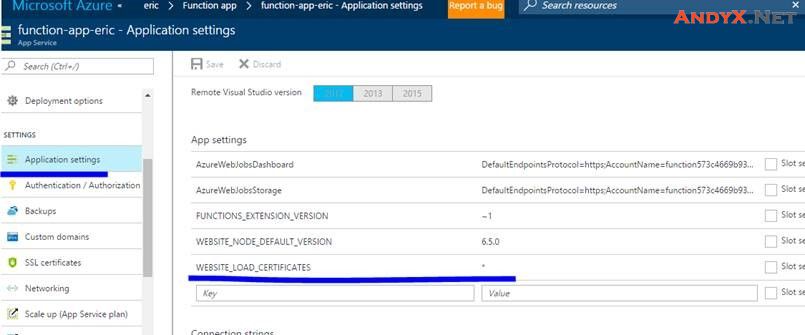
1、Azure function 是一种 app service服务,是有部分权限的限制的。比如,您没有权限访问系统文件夹。这样可能导致您无法执行一部分高权限操作。当然,其中的一种方法是上传自己的密钥,然后在app setting 配置WEBSITE_LOAD_CERTIFICATES =*加载所有密钥,这样就可以获取你自己上传的密钥了。
2、其实还有另外一种方法,你可以使用azure keyvault。azure keyvault可以保护您的密钥,并可以使用keyvault 带来的其他先进特性,这儿就不赘述了。
回归正题,如何把证书保存在Azure Keyvault中呢?又如何Azure function 中获取这个证书呢?
下面让我详细介绍。这个解决方案中,我们需要如下几个步骤:
1. 使用powershell制定自定义签名,并导出到本地
$cert = New-SelfSignedCertificate -CertStoreLocation "cert:\CurrentUser\My" -Subject "CN=function-cert-nethappy.com.cn" -KeySpec KeyExchange
$password = ConvertTo-SecureString -String "iovex@123456" -Force -AsPlainText

Export-PfxCertificate -Cert $cert -FilePath "d:\cert-function-eric.pfx" -Password $password
Export-Certificate -Type CERT -Cert $cert -FilePath "d:\cert-function-eric.cer"
2. 使用powerhshell 创建 service principal 来实现自动化
#登录Azure账户
Login-AzureRmAccount

#使用自签名证书创建service principal
$keyValue = [System.Convert]::ToBase64String($cert.GetRawCertData())
$app = New-AzureRmADApplication -DisplayName "function-cert-nethappy" -HomePage "https://www.function-cert-nethappy.com.cn/index010601" -IdentifierUris "https://www.function-cert-nethappy.com.cn/index010601" -CertValue $keyValue -EndDate $cert.NotAfter -StartDate $cert.NotBefore

New-AzureRmADServicePrincipal -ApplicationId $app.ApplicationId
New-AzureRmRoleAssignment -RoleDefinitionName Reader -ServicePrincipalName $app.ApplicationId.Guid

#获取到的下面信息会在后面用到
$certThumbprint = $cert.Thumbprint
$appId = $app.ApplicationId
$tenantId = (Get-AzureRmSubscription).TenantId
3. 上传自签名证书并配置Azure function 的SSL


4. 创建Keyvault,并设置Access policy,把用于接口验证的证书上传到 secret
#创建keyvault 参照https://docs.microsoft.com/zh-cn/azure/key-vault/key-vault-get-started#a-idvaultacreate-a-key-vault

#设置权限
Set-AzureRmKeyVaultAccessPolicy -VaultName 'keyvault-eric' -ServicePrincipalName $appId -PermissionsToKeys all -PermissionsToSecrets all

#保存证书
$cerFilePath = 'D:\cert-web-app-eric-1128.cer'
$clearBytes = Get-Content -Path $cerFilePath -Encoding Byte
$fileContentEncoded = [System.Convert]::ToBase64String($clearBytes)
$secret = ConvertTo-SecureString -String $fileContentEncoded -AsPlainText -Force
$secretContentType = 'application/pkix-cert'
Set-AzureKeyVaultSecret -VaultName 'keyvault-eric' -Name 'exportable-secret' -SecretValue $secret -ContentType $secretContentType
5. 创建Azure function app,并使用自签名证书的指纹和相应的Aervice principal 的 appid 等信息在 Azure function 实现自动登陆,然后执行 Get-AzureKeyVaultSecret获取证书的内容,重建证书。
# 使用service principal + 自签名证书指纹自动登陆
$certThumbprint = ""
$appId = ""
$tenantId = ""
Login-AzureRmAccount -ServicePrincipal -CertificateThumbprint $certThumbprint -ApplicationId $appId -TenantId $tenantId

# 获取证书内容
$keyVaultSecret = Get-AzureKeyVaultSecret -VaultName 'keyvault-eric' -Name 'exportable-secret'
$secret = $keyVaultSecret.SecretValueText
$clearBytes = [System.Convert]::FromBase64String($secret)

#重建证书
$cert = New-Object -TypeName System.Security.Cryptography.X509Certificates.X509Certificate2
$cert.Import([byte[]]$clearBytes)
$cert.PublicKey.Key
$cert.Thumbprint
注意:
1、如果证书包含私钥,不可以通过此种方法重建,因为权限的原因,包含私钥可能导致重建证书报错。
2、自签名证书仅用于实现自动登陆的功能,可以参见微软官方文档《如何:使用 Azure PowerShell 创建具有证书的服务主体》
3、能找到自签名证书,并通过service principal 方式实现自动登陆。
(END)
文章源自:Dev Chat 在线支持
作者:

