Fence是RedHat的高可用(high availability)集群中预防集群出现”脑裂”之后节点争抢文件系统的一种手段。
Fence通常分为硬件Fence和软件Fence:硬件Fence是指通过一种特殊的硬件设备关掉电源来关闭故障的服务器,软件Fence是通过软件/系统来实现关闭故障的服务器。
在这里就不得不提及”脑裂”这个专业名词了。在HA集群系统中,假设有同一个整体、动作协调的节点A 和节点B,节点A和B之间通过heartBeat来检查对方的存活状态,负责协调保证整个集群服务的可用性。正常情况下,如果节点A通过心跳检测不到B的存在的时候,就会接管B的资源,同理节点B检查不到B的存活状态的时候也会接管A的资源。如果出现网络故障,就会导致A和B同时检查不到对方的存活状态认为对方出现异常,这个时候就会导致A接管B的资源,B也会接管A的资源。原来被一个节点访问的资源就会出现被多个节点同时访问的情况,这种情况就是脑裂现象。
[本文由AndyX撰写,本文的“Azure Portal”门户界面以中文为主,仅供参考。]
[本人中所有涉及到 Azure 的实验均在 Azure Global 国际版中进行配置,部分功能可能在 Azure 世纪互联中受到限制]
[本文为AndyX.Net原创文章,遵循 CC 4.0 BY-SA 版权协议,转载请附上原文出处链接和本声明!]
[如果本文章帮助到了您,请在记得在文章末尾“打赏”作者,感谢!]

展开索引
初始化实验环境
- OS:Red Hat Enterprise Linux 8.1 with HA add-on – Gen1
- VM1:Fence-01-Mark
- VM2:Fence-02-Mark
- VMSKU:Standard_B2s
- AAD APP:AndyX.Net-Fence-Test
一、创建VM
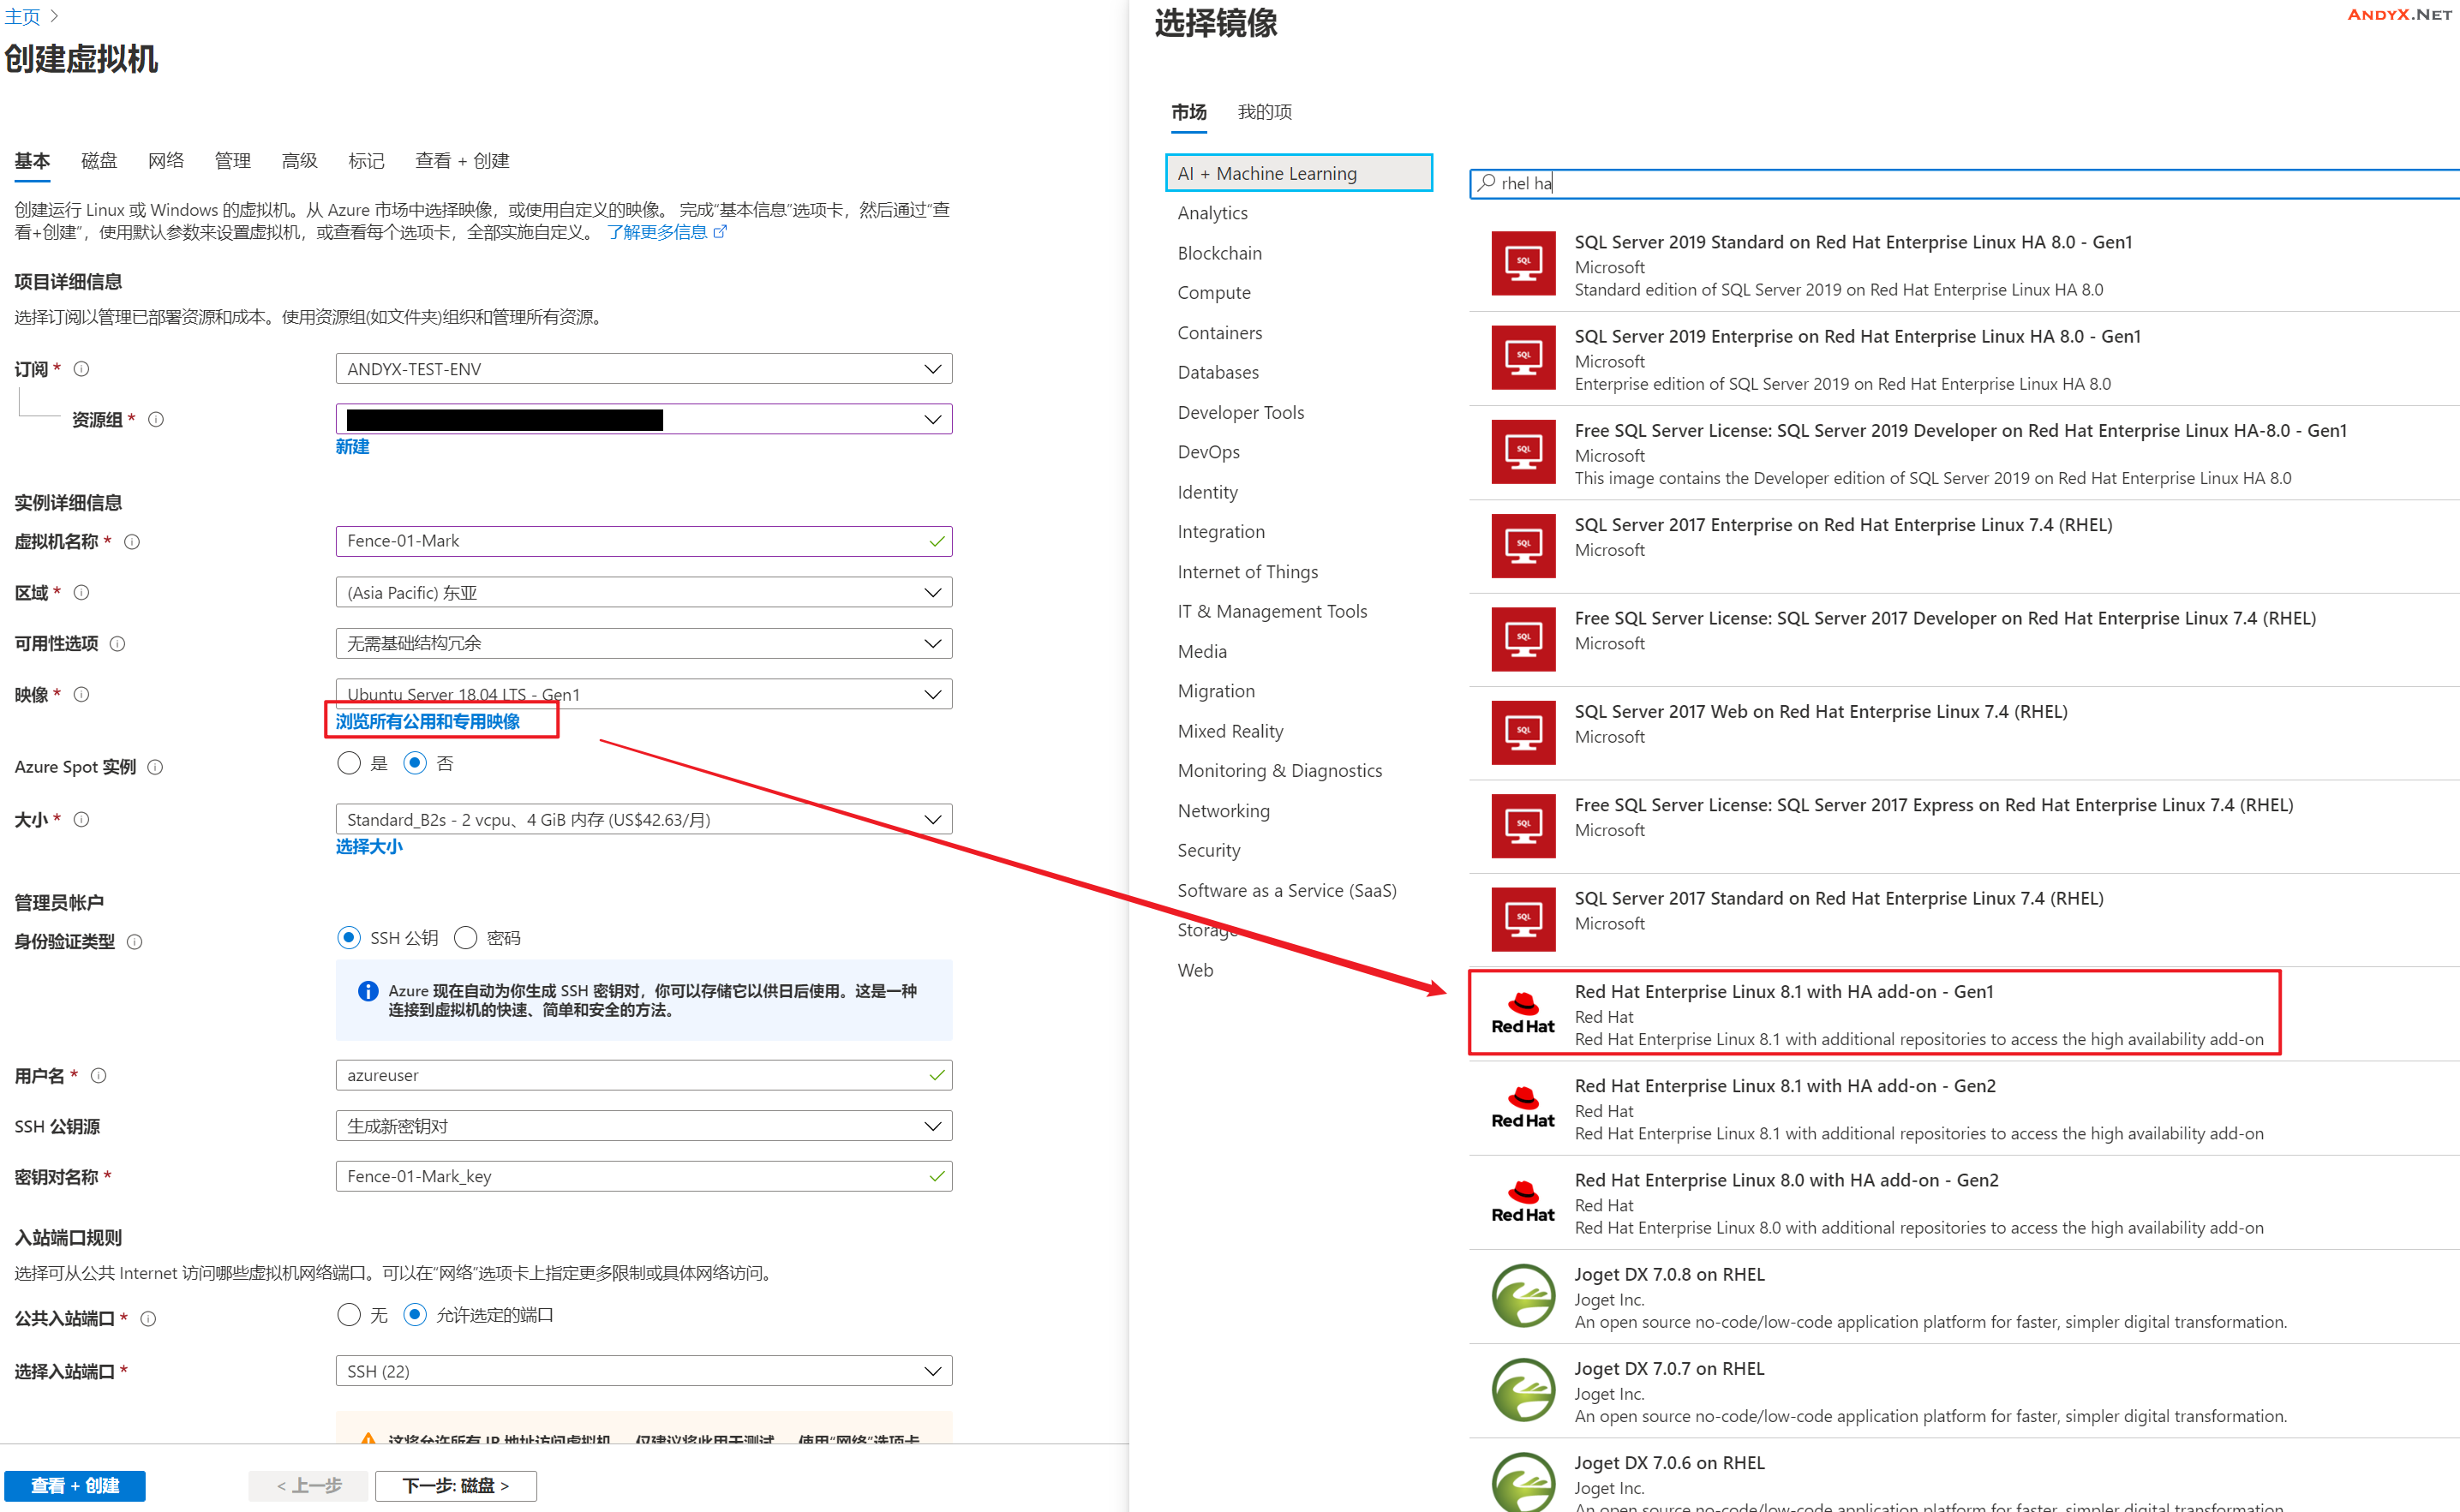
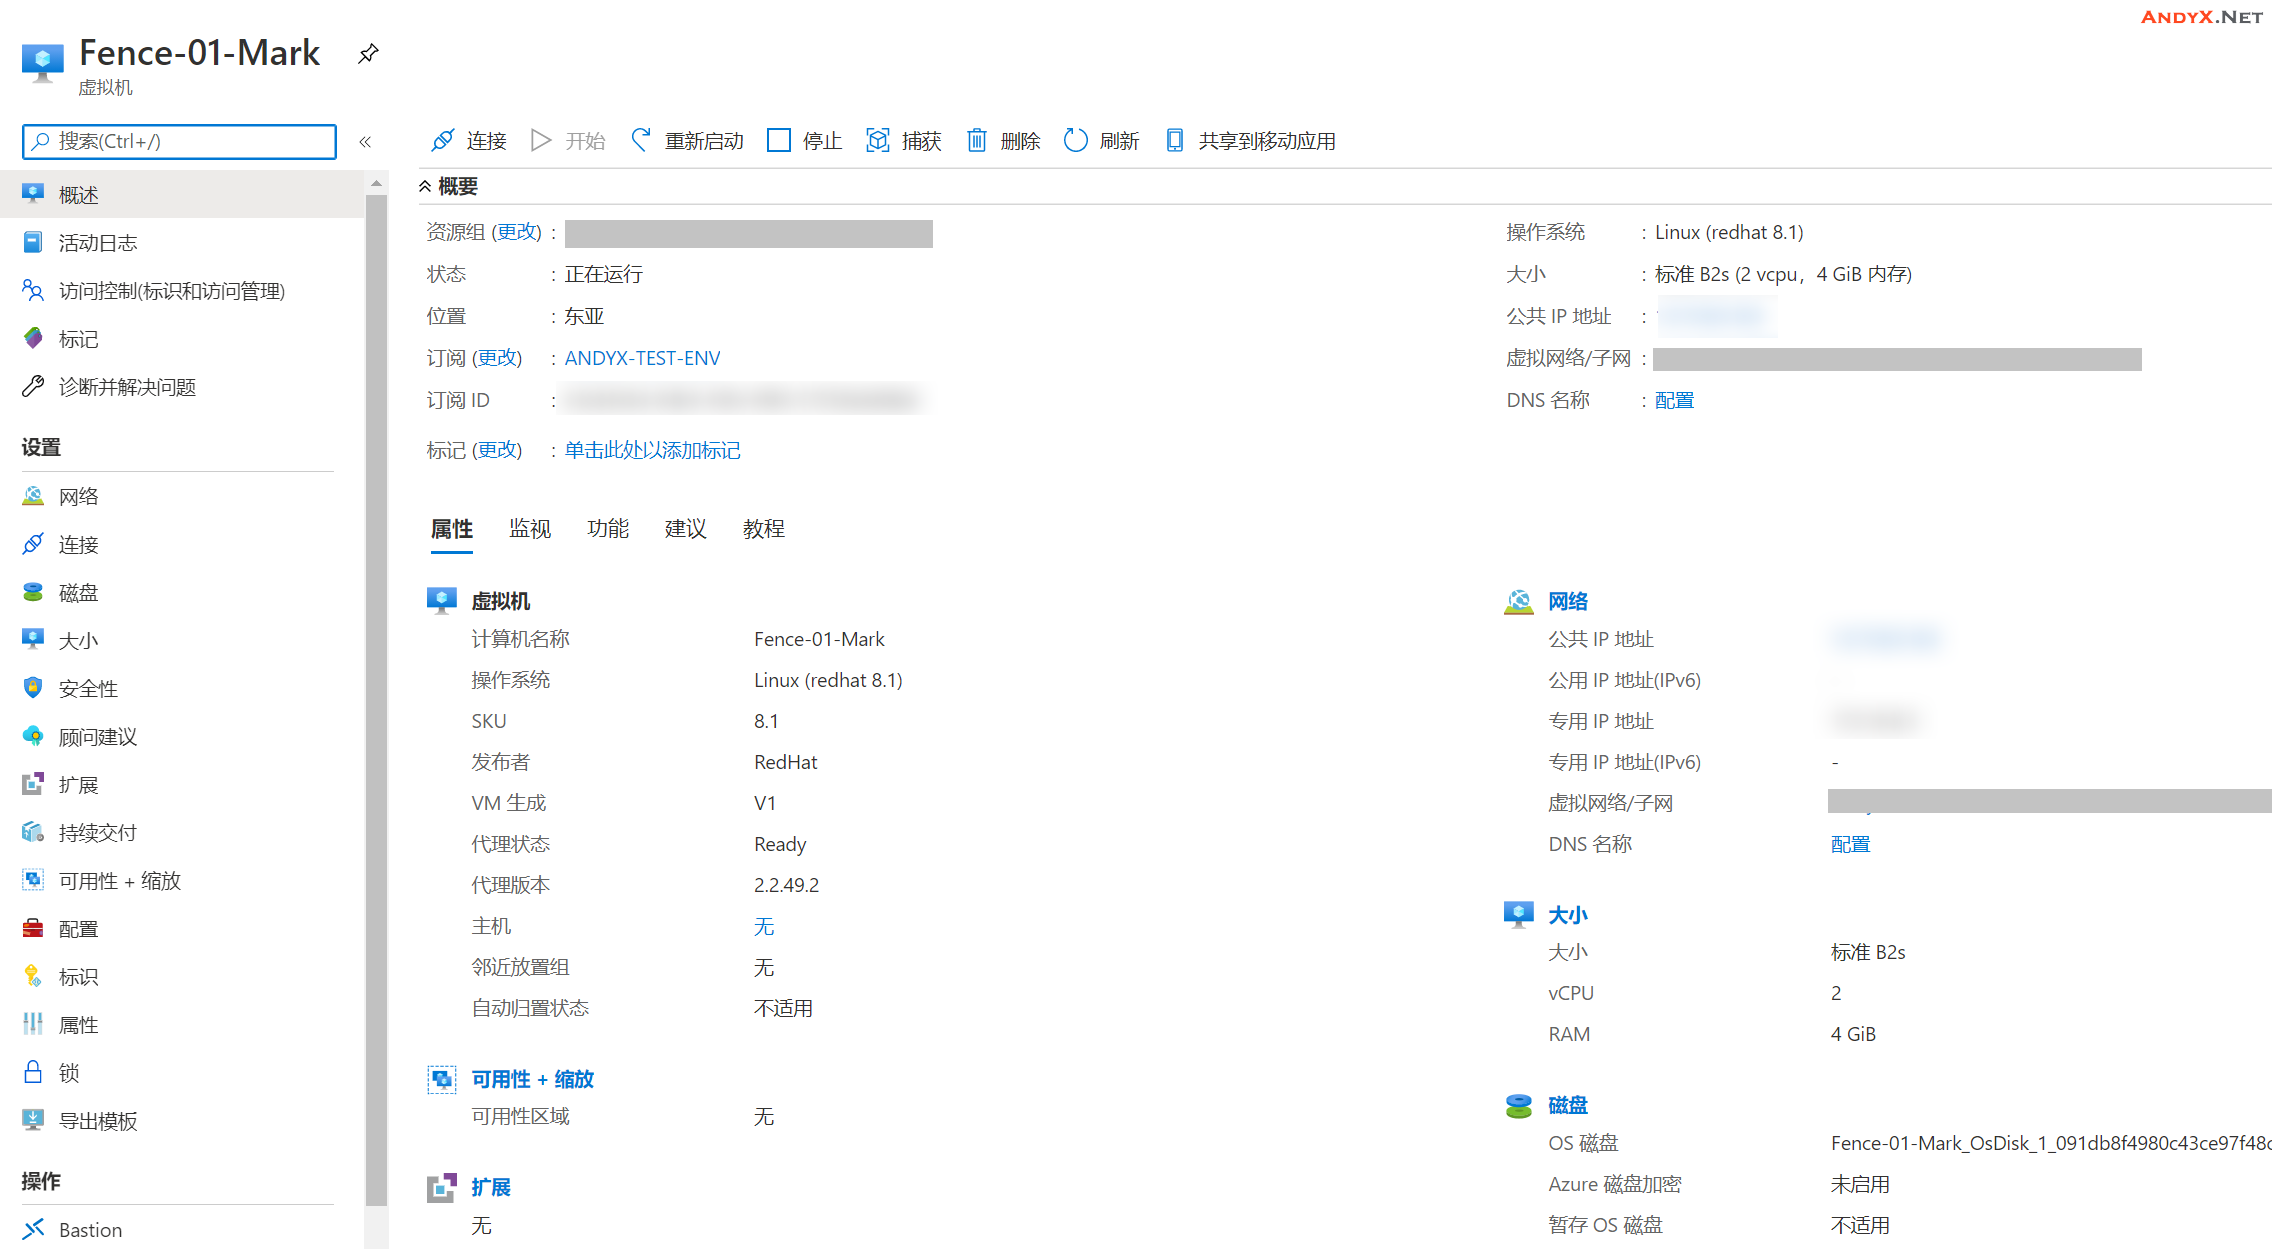
分别新建两台带有HA标记的的RHEL系统的VM,让其在同一个VNet下
- 点击“浏览所有公用和专用镜像”
- 搜索RHEL HA关键字
- 选择Red Hat Enterprise Linux 8.1 with HA add-on – Gen1
(**选择此镜像可以免除配置HA源以及激活RHEL订阅的麻烦)
二、安装Fence集群
分别登陆Fence-01-Mark和Fence-02-Mark,下面操作将会在两台VM上同时进行!
1.进入管理员模式
sudo -i
2. 建议先进行升级
yum update

3. 安装fence包(VM 01跟02都要装):
yum install -y pcs pacemaker fence-agents-azure-arm nmap-ncat
4. 设置主机名(Hostname)
**此步骤为非必要步骤,只是为了展示在配置STONITH时候区分HostName和VMName,实际环境默认即可。
hostnamectl set-hostname fence001

**注意,此操作同样需要配置在02号VM上完成,将02号VM的hostname改名为fence002
5. 设置主机名称解析
**如果在fence群集配置中使用主机名,则必须具有相应的的主机名解析。 如果名称不可用则将会导致群集通信失败。
5.1. 运行命令查看本机ip:
ifconfig

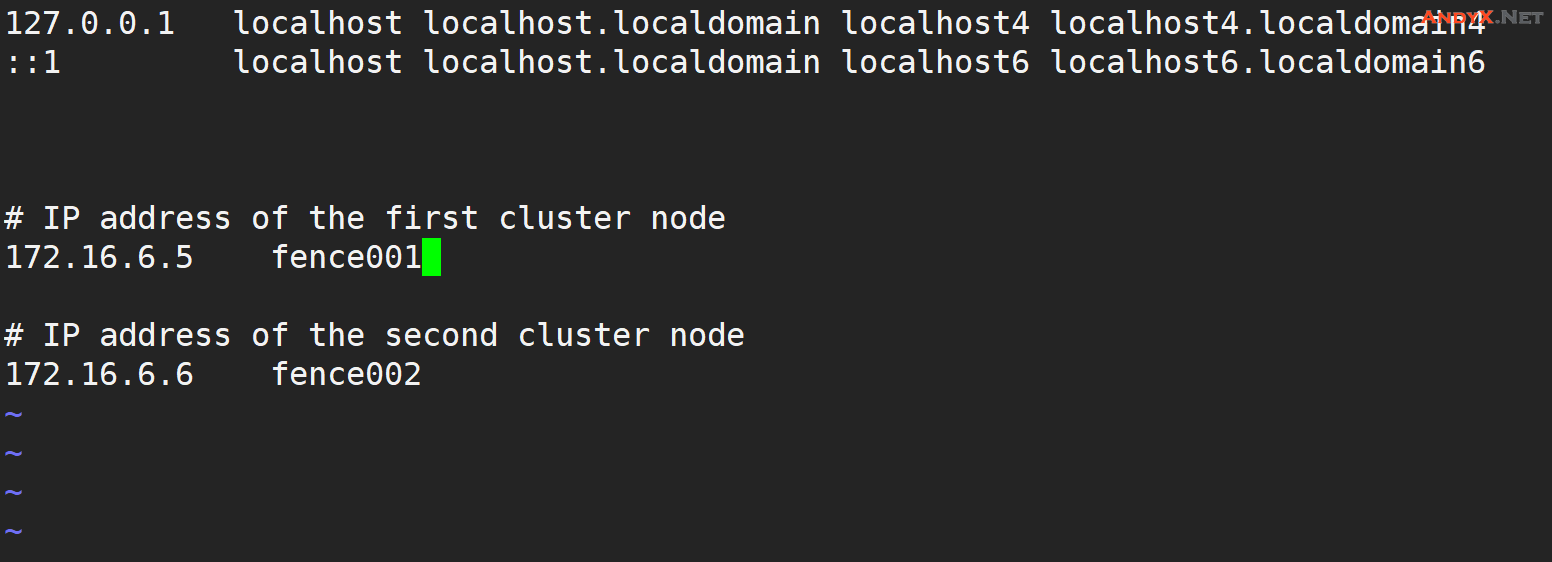
5.2. 运行命令修改本地主机名称解析
vi /etc/hosts

#将以下行插入 /etc/hosts。 根据环境更改 IP 地址和主机名。

# IP address of the first cluster node第一个节点主机名
172.16.6.5 fence001

# IP address of the second cluster node第二个节点主机名
172.16.6.6 fence002
5.3. 验证使用hostname主机名通信是否正常:
ping fence001
ping fence002

6. 将 hacluster 密码更改为相同的密码(账户hacluster隶属于fence服务,用于集群通信验证)
passwd hacluster

7. 为 Pacemaker 添加防火墙规则
由于Redhat默认使用firewalld作为默认防火墙,所以需要向群集节点之间的所有群集通信添加以下防火墙规则。
firewall-cmd --add-service=high-availability --permanent
firewall-cmd --add-service=high-availability

8. 启用基本群集服务
运行以下命令启动 Pacemaker 服务并设置为开机自启。
systemctl start pcsd.service
systemctl enable pcsd.service
**以下命令只在VM01上运行即可**
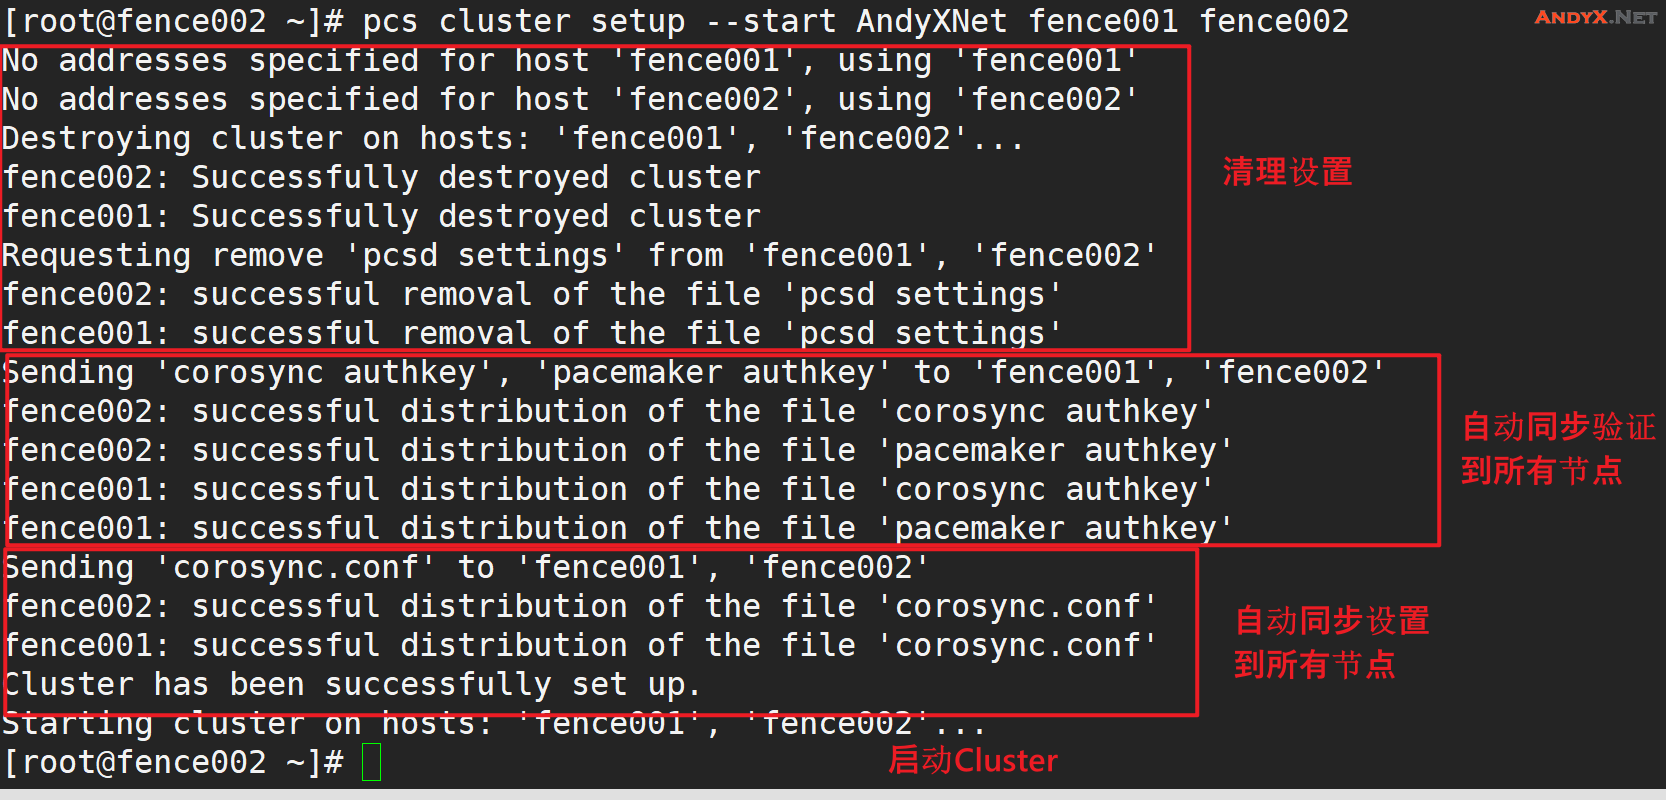
9. 创建 Pacemaker 群集
运行以下命令以验证节点并创建群集,并允许内存保留。
pcs host auth [Hostname1] [Hostname2] -u hacluster
pcs cluster setup --start [ClusterName] [Hostname1] [Hostname2]
此处让我们创建一个名为AndyXNet的集群,集群中包含fence001和fence002两个节点

10. 设置预期投票
**该设置表示为:群集存活需要2票(通常数值为node的数量),这个修改只影响当前running的群集,不会变成群集的永久性配置保存下来
pcs quorum expected-votes 2
11. 允许并发隔离操作
pcs property set concurrent-fencing=true
12. 启用所有node节点:
pcs cluster enable --all
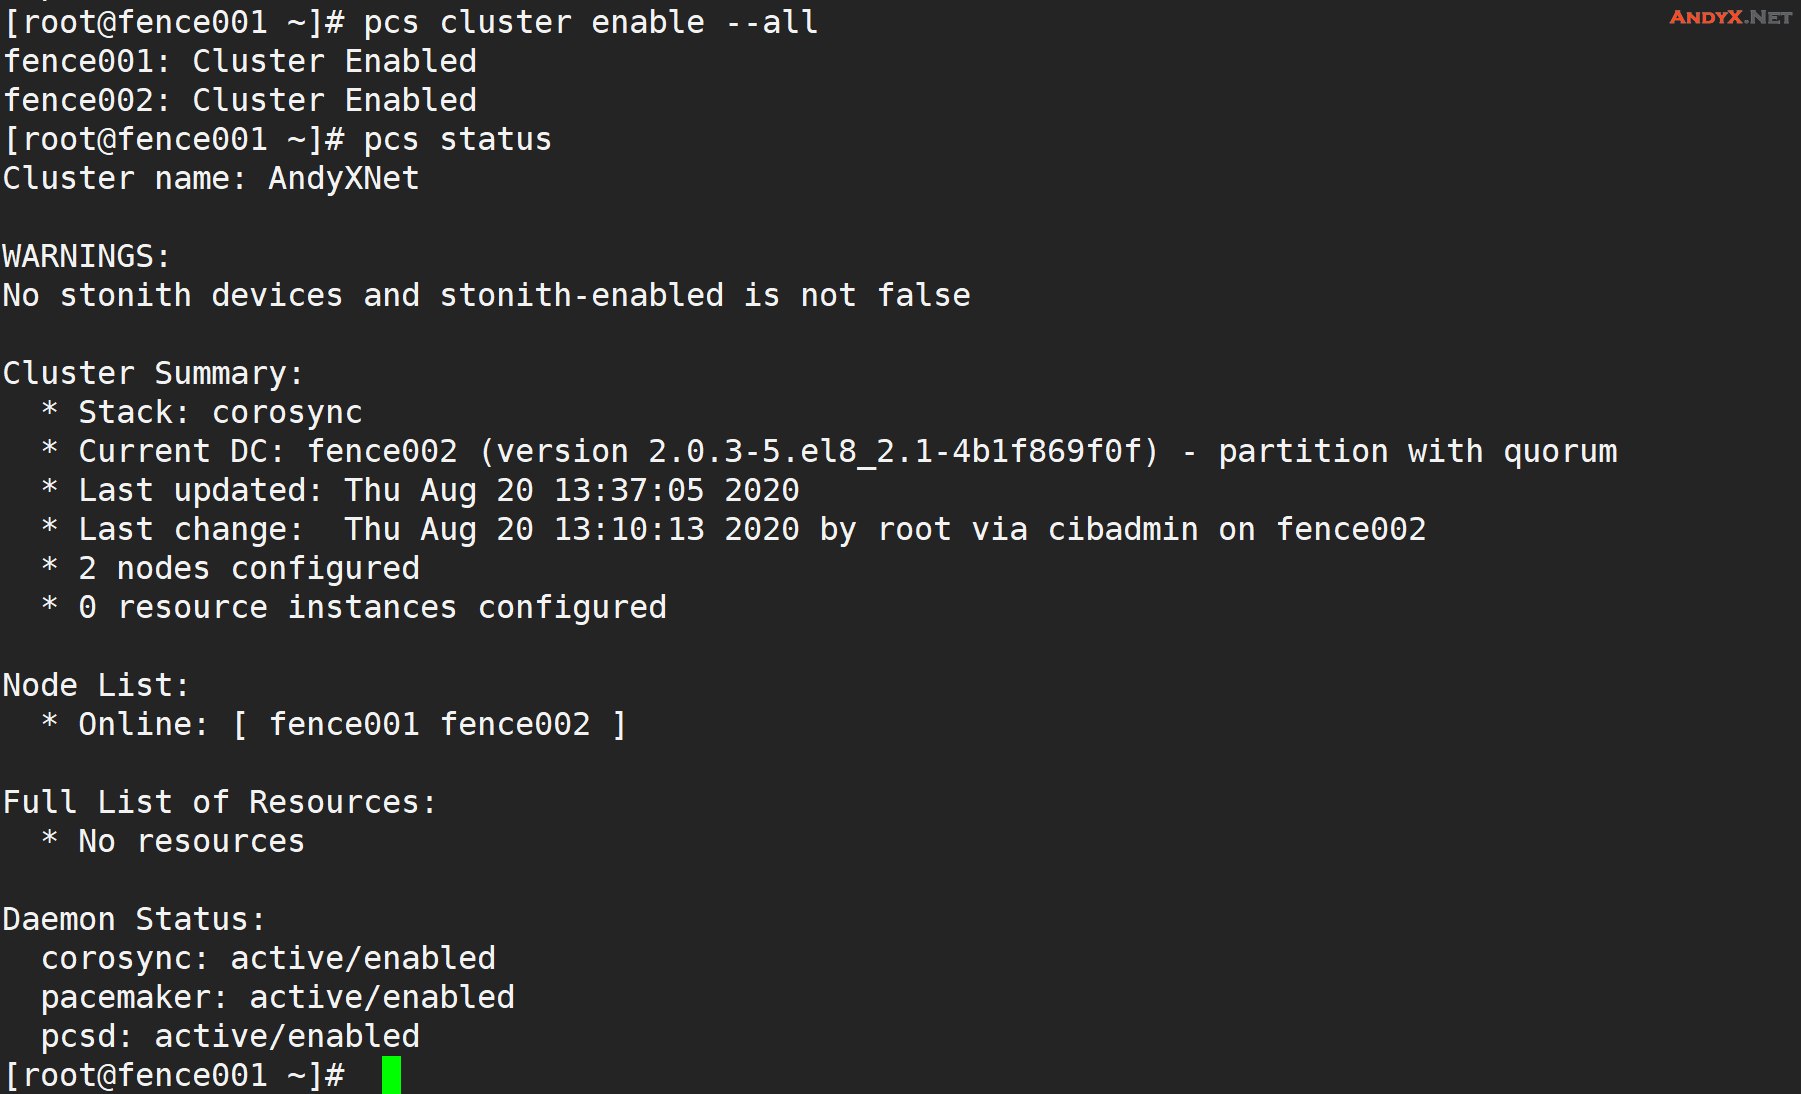
13. 检查Fence集群配置状况:
pcs status
**在这里我们可以看到WARNINGS,这意味着需要接下来继续配置。
三、创建 Azure ServicePrincipal服务主体以及应用
STONITH 设备使用Service Principal(服务主体)对 Microsoft Azure 进行授权。 请按照以下步骤创建Service Principal(服务主体)。
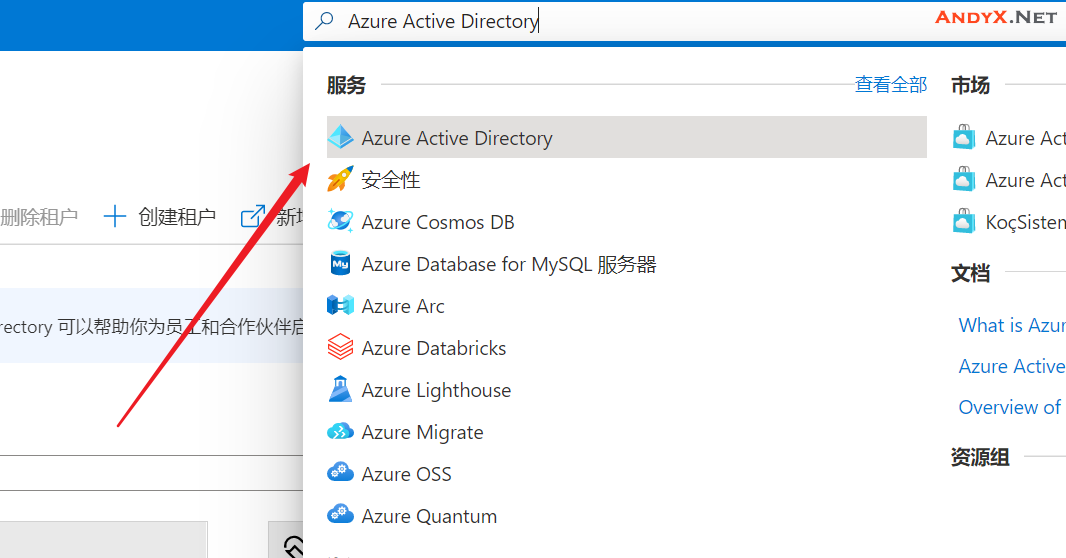
1.访问 https://portal.azure.com
搜索并打开“Azure Active Directory”选项卡
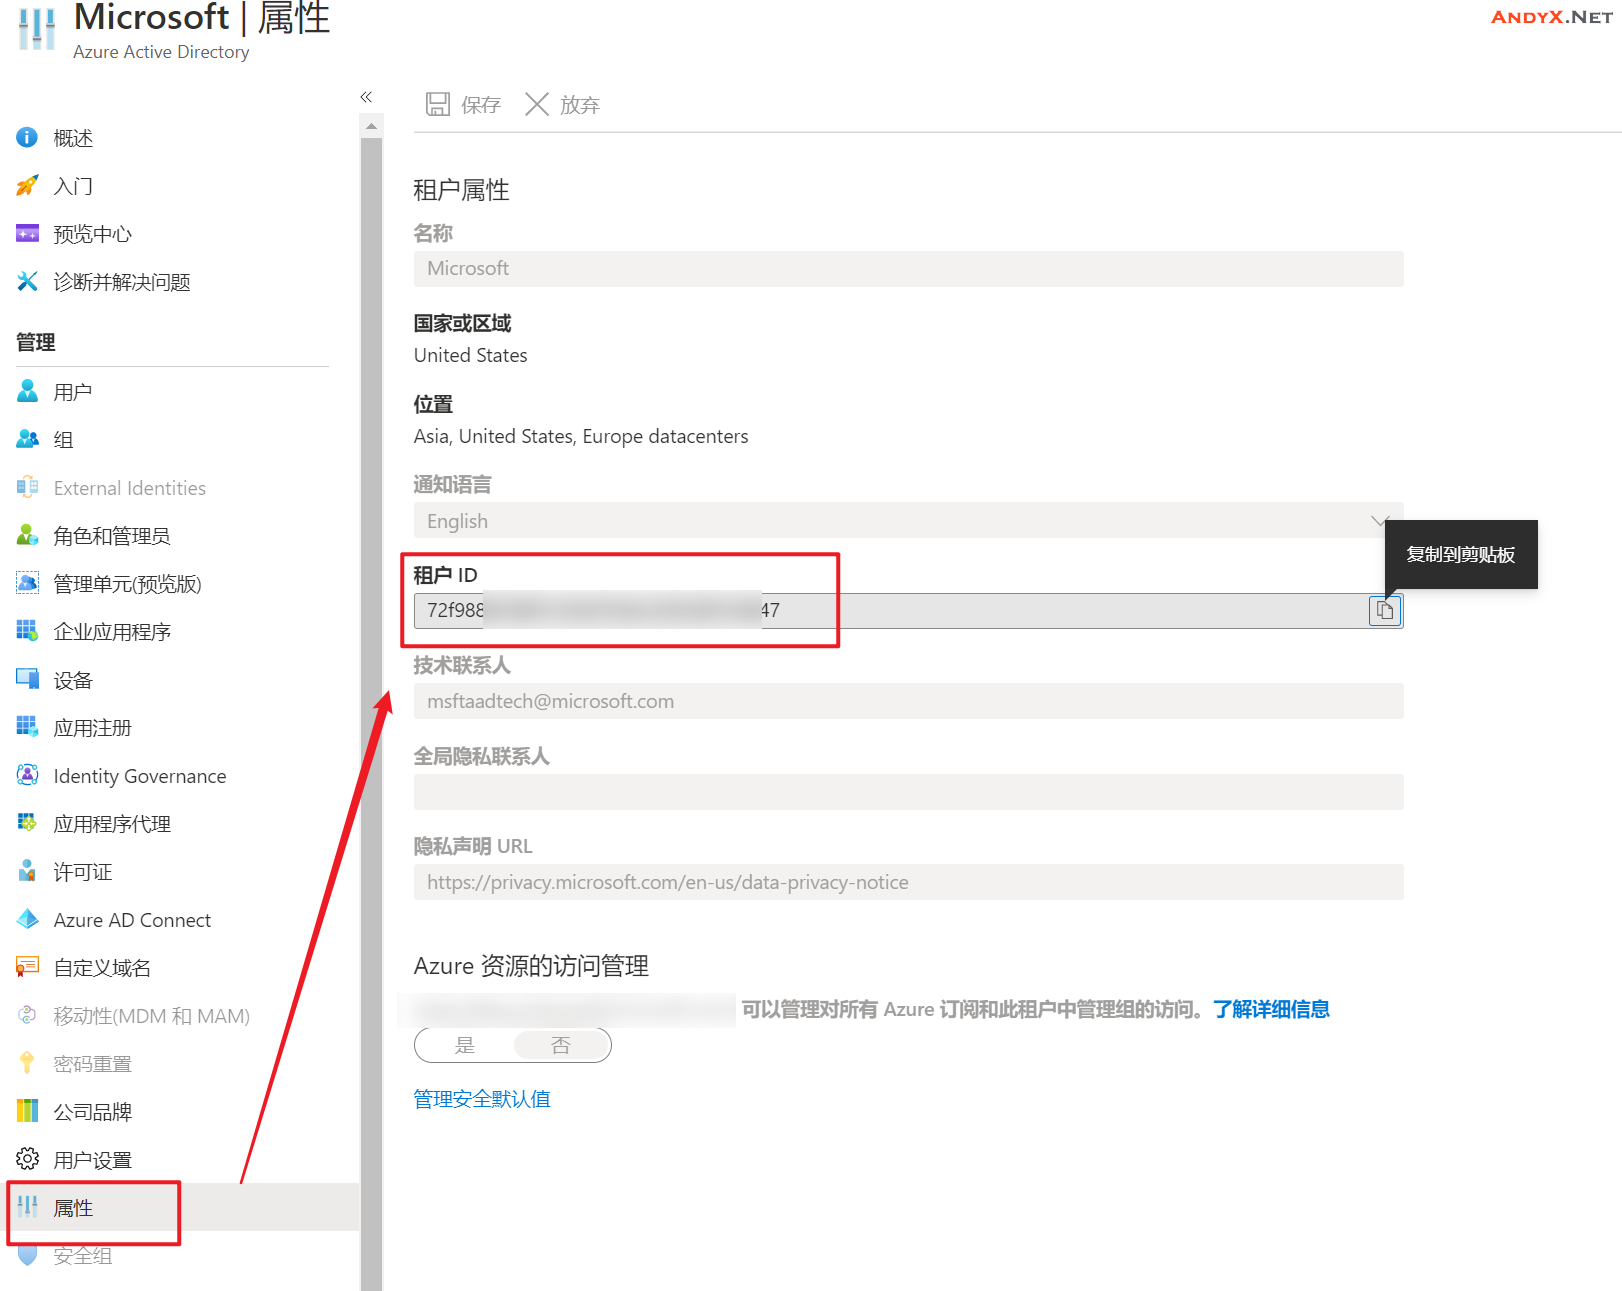
2. 转到“属性”并记下目录 ID。 这是“租户 ID”。
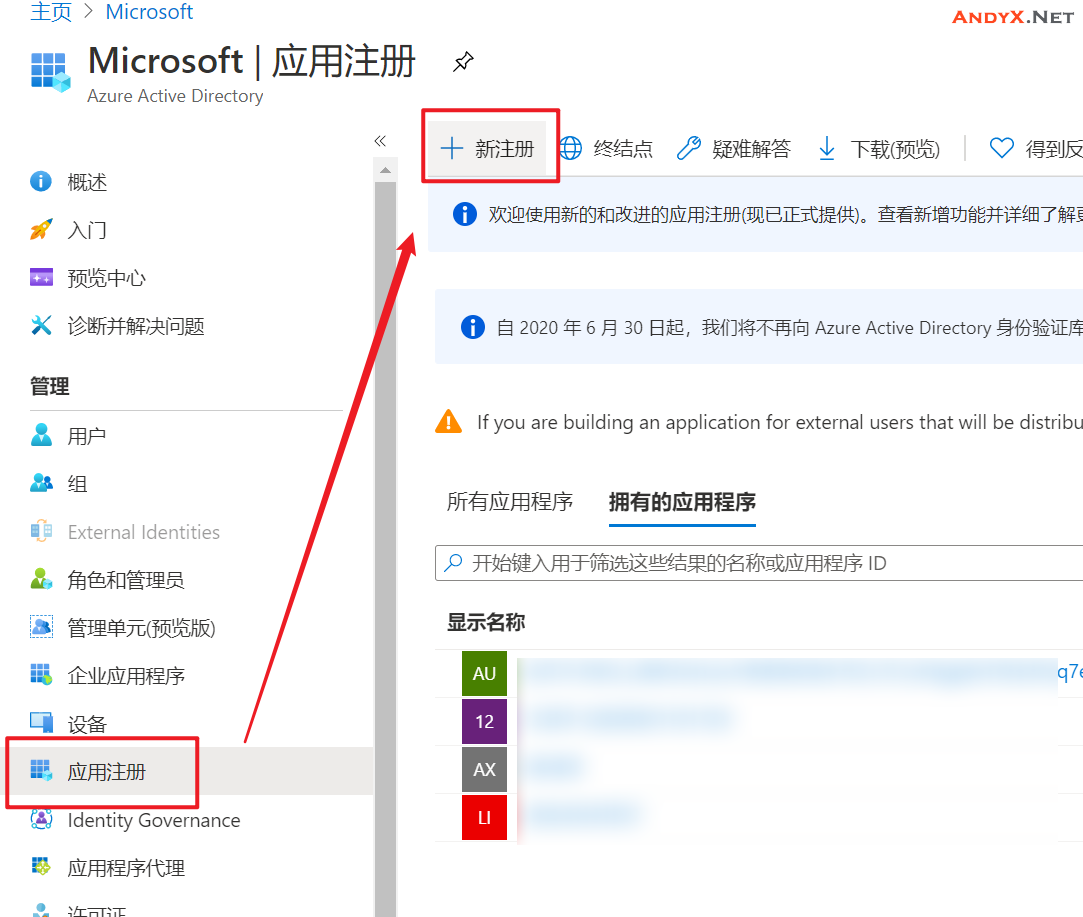
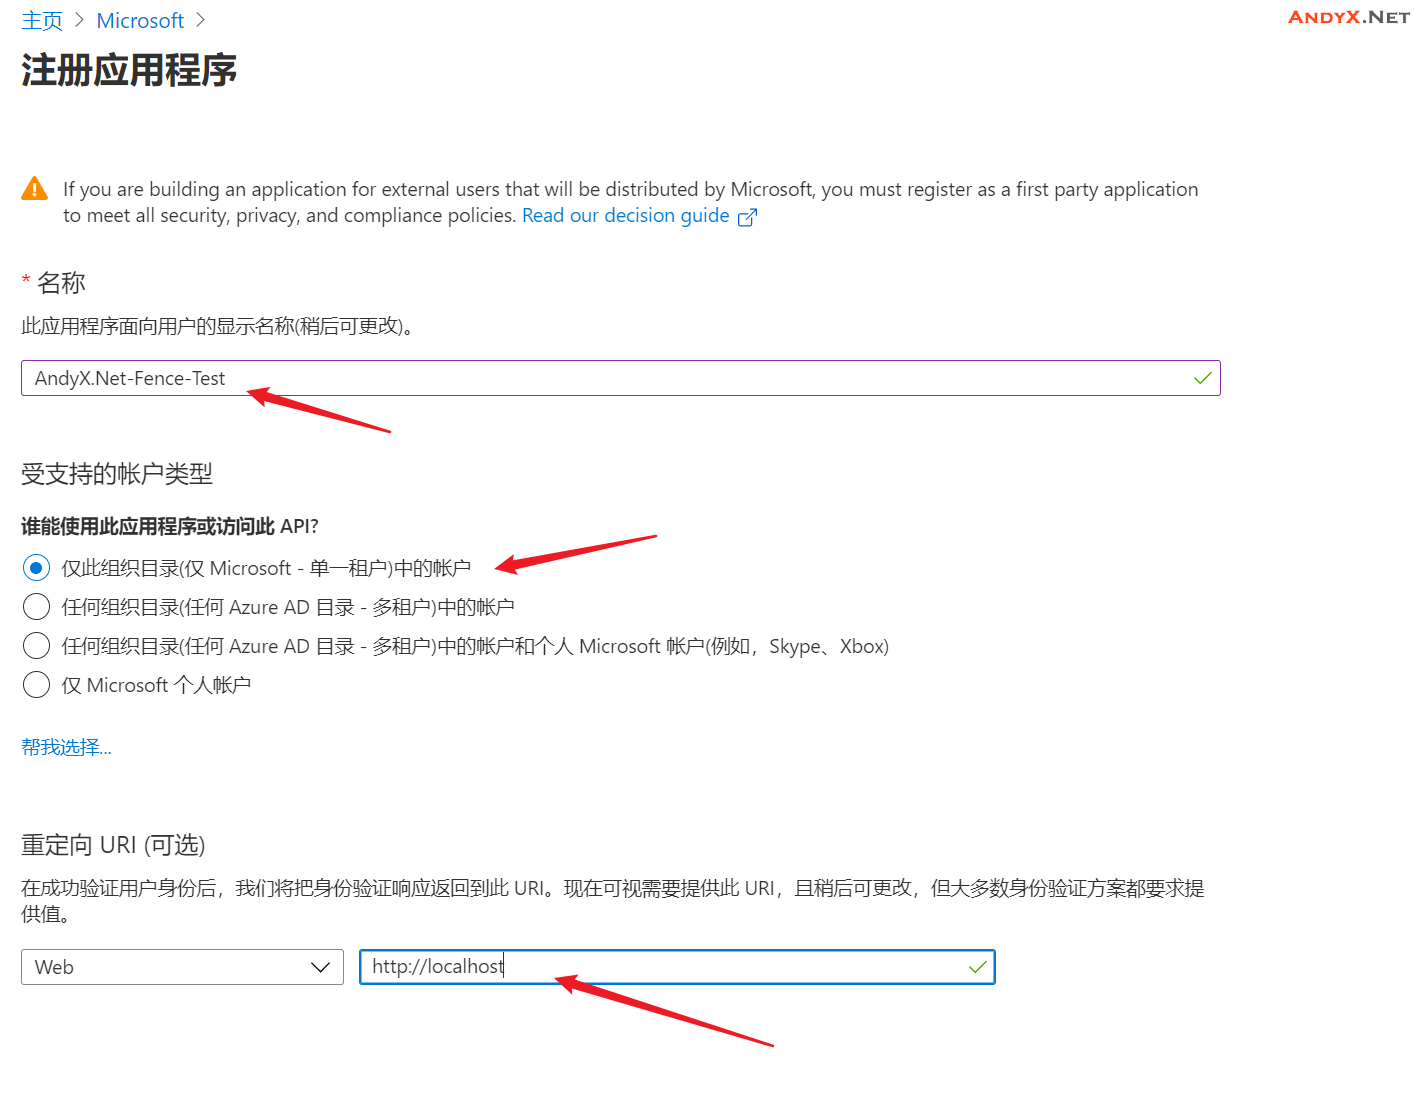
3. 单击“应用注册” -> “新建注册”
4. 输入名称,选择“仅限此组织目录中的帐户” 。
选择“Web”作为应用程序类型,输入登录 URL(例如 http://localhost),然后单击“添加”
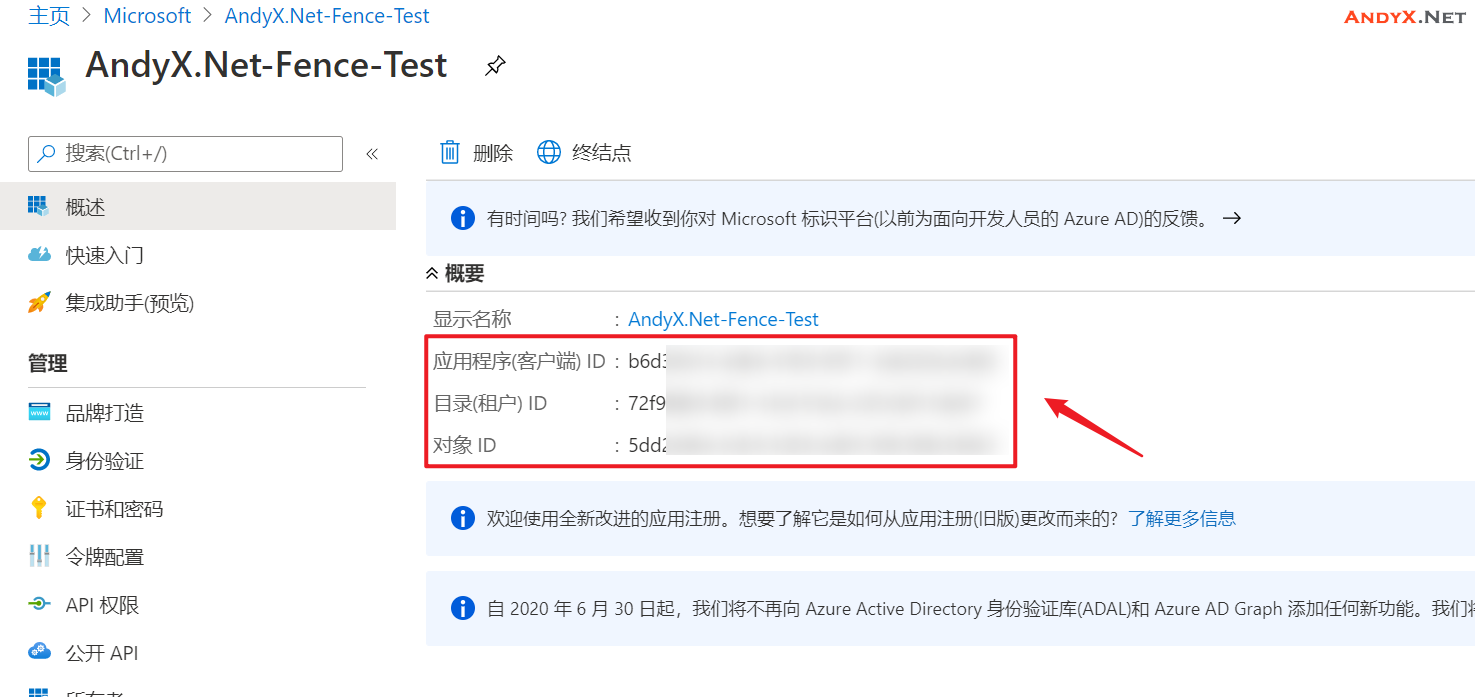
5. 将所“应用程序(客户端) ID”、“目录(租户) ID”、“对象 ID”记到记事本中,以便待会在用。
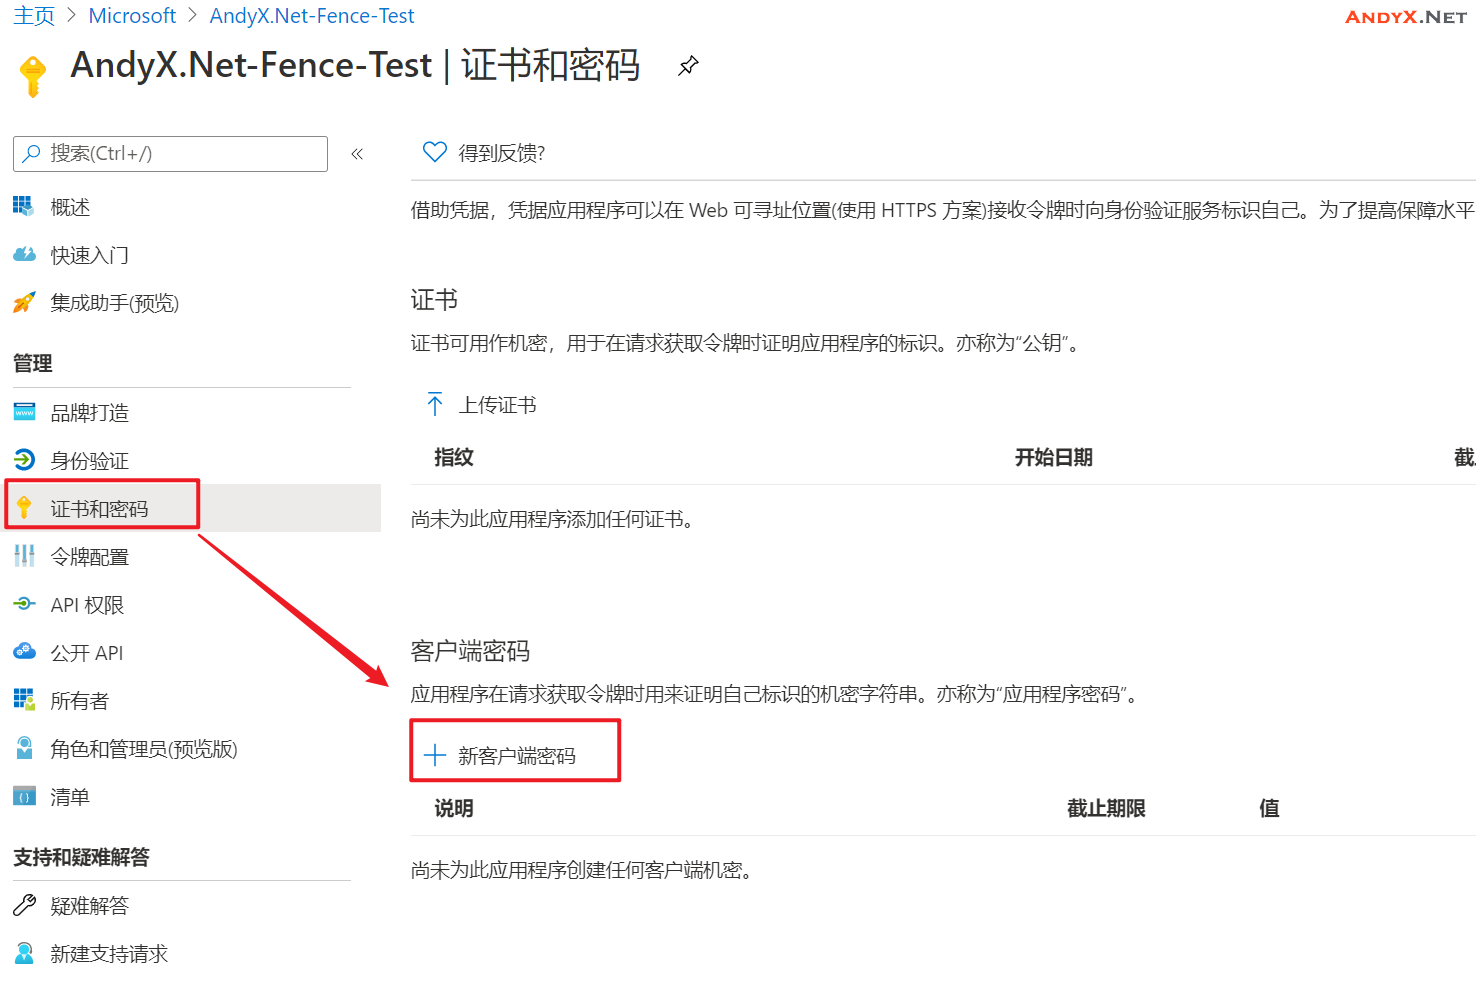
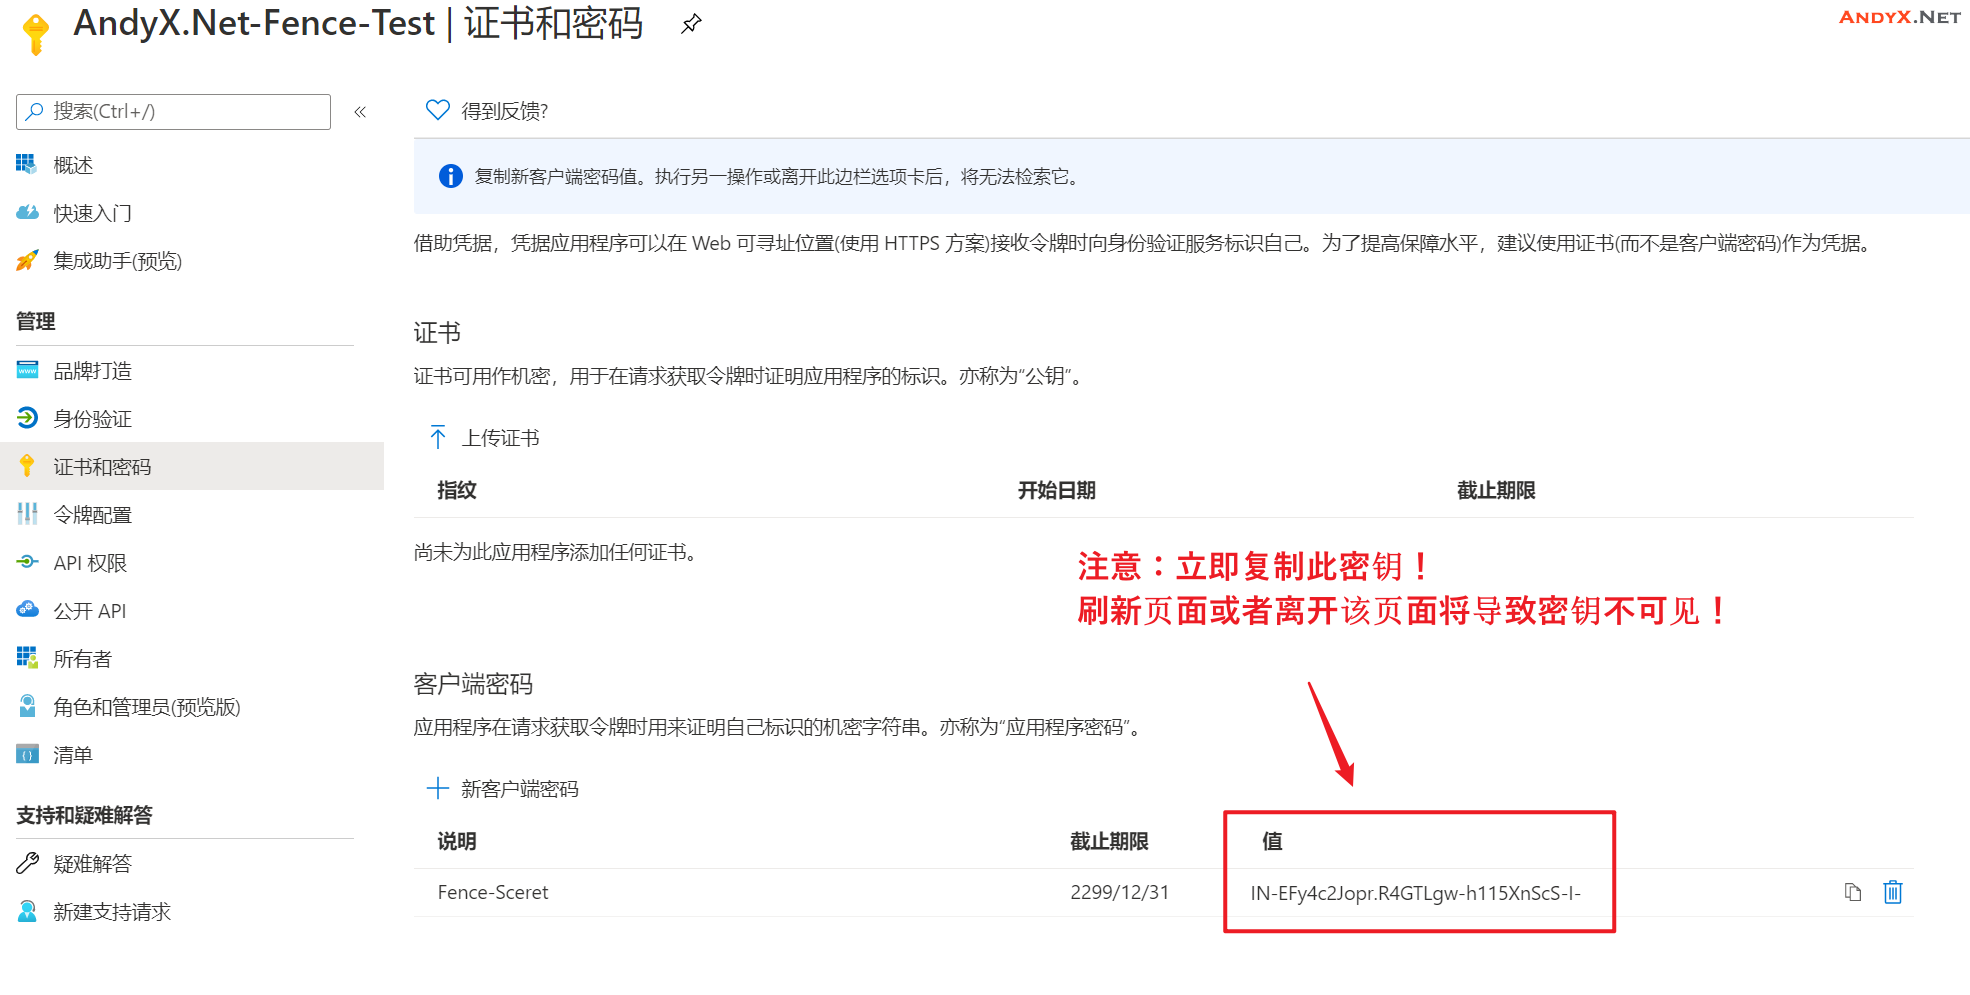
6. 选择“证书和机密”,然后单击“新建客户端机密”
7. 输入新密钥的说明,选择“永不过期”,并单击“添加”
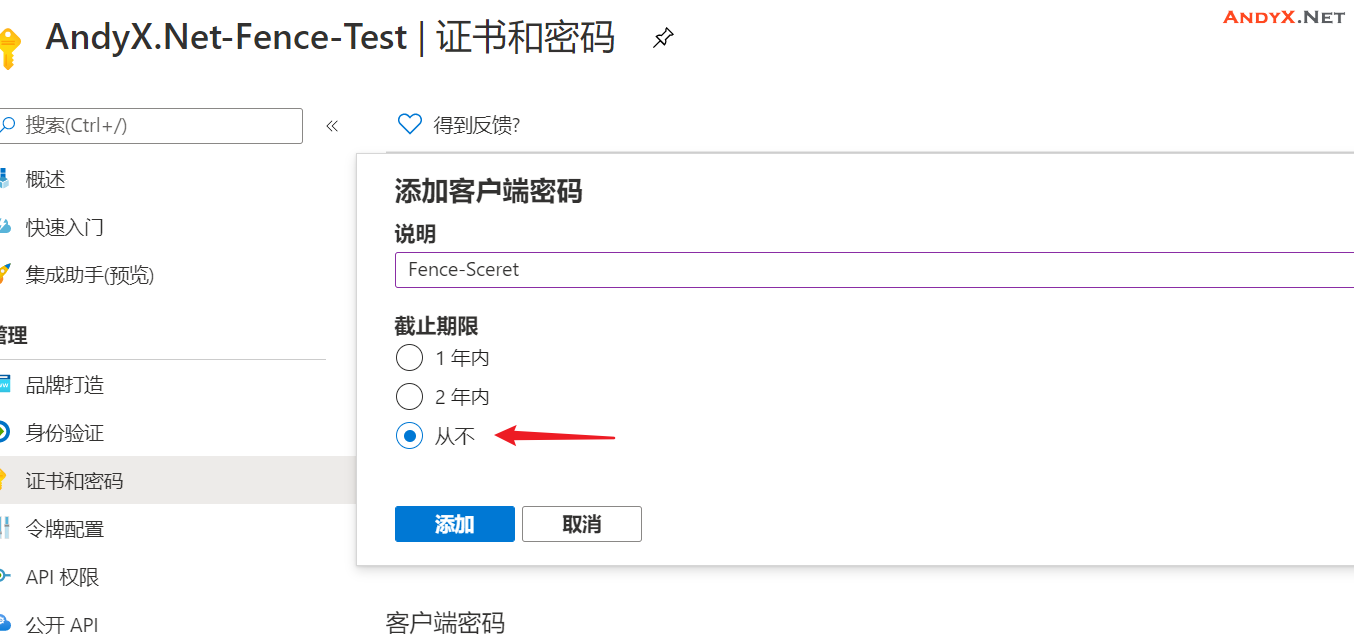
8. 记下“值”。 此值用作服务主体的密码。
四、为Fence Agnet创建自定义角色
默认情况下,服务Service Principal(服务主体)无权访问 Azure 资源。 需要为Service Principal(服务主体)授予启动和停止(关闭)群集所有虚拟机的权限。
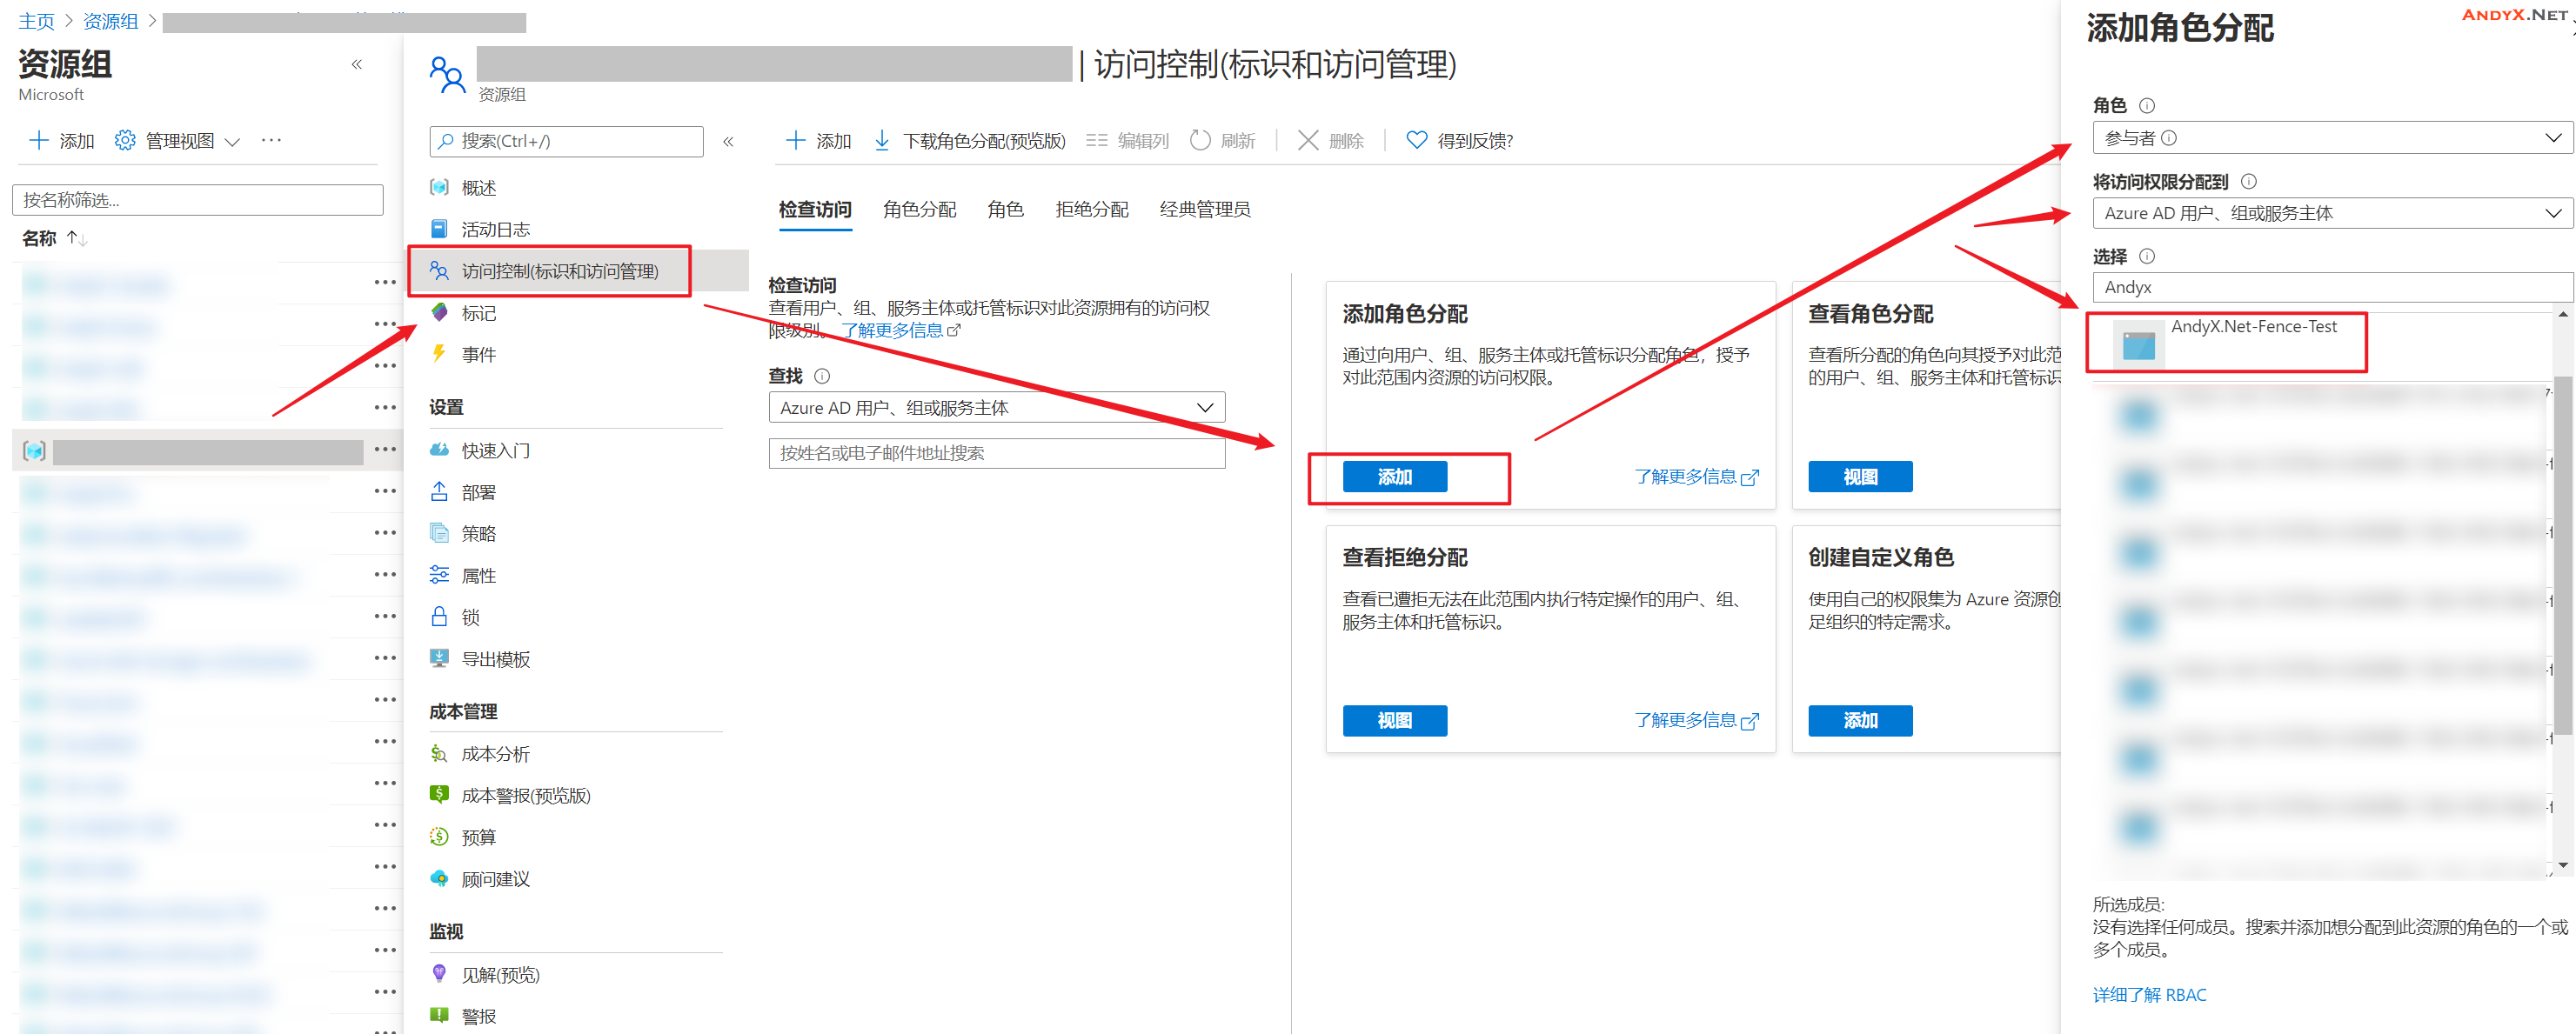
- 在Portal(门户)中分别定位到你的资源组(Fence-test)
- 访问控制(标识和访问管理) -> 添加角色分配
- 配置为: 角色-参与者 访问权限-AzureAD用户服务主体 选择-你的AAD应用名称
- 最后记得点保存
**推荐将Service Principal分配到VM对应的管理角色(role),对每个VM都要执行,但在这里我就偷个懒只对资源组做了分配,这是不安全的。
**在这里建议使用自定义一个role,只给最小权限。自定义role需要Azure订阅是PP1或者PP2级别
五、创建并激活 STONITH 设备
**以上设置完成之后,我们已经跑完了80%的流程
**配置fence设备时,应注意该设备是否与群集中的任何节点或设备共享电源。如果节点及其fence设备确实共享电源,若该节点及其fence设备的电源应丢失,群集可能会面临无法对该节点进行fence保护的风险。建议在Azure中对于所有fence的VM启用availability set(可用集)
1. 设置stonith超时以及定义stonith设备
pcs property set stonith-timeout=900

pcs stonith create [stonithName] fence_azure_arm login="[ApplicationID 应用程序ID]" passwd="[servicePrincipalPassword服务主体密钥]" resourceGroup="[resourceGroupName资源组名称]" tenantId="[tenantID 目录租户 ID]" subscriptionId="[subscriptionid订阅ID]" pcmk_host_map="[Hostname1]:[VMName1];[Hostname2]:[VMName2]" \
power_timeout=240 pcmk_reboot_timeout=900 pcmk_monitor_timeout=120 pcmk_monitor_retries=4 pcmk_action_limit=3 \
op monitor interval=3600
**如果你使用的是Azure China,则需要附加指定的参数cloud=china,如果使用Azure global不需要指定此参数。
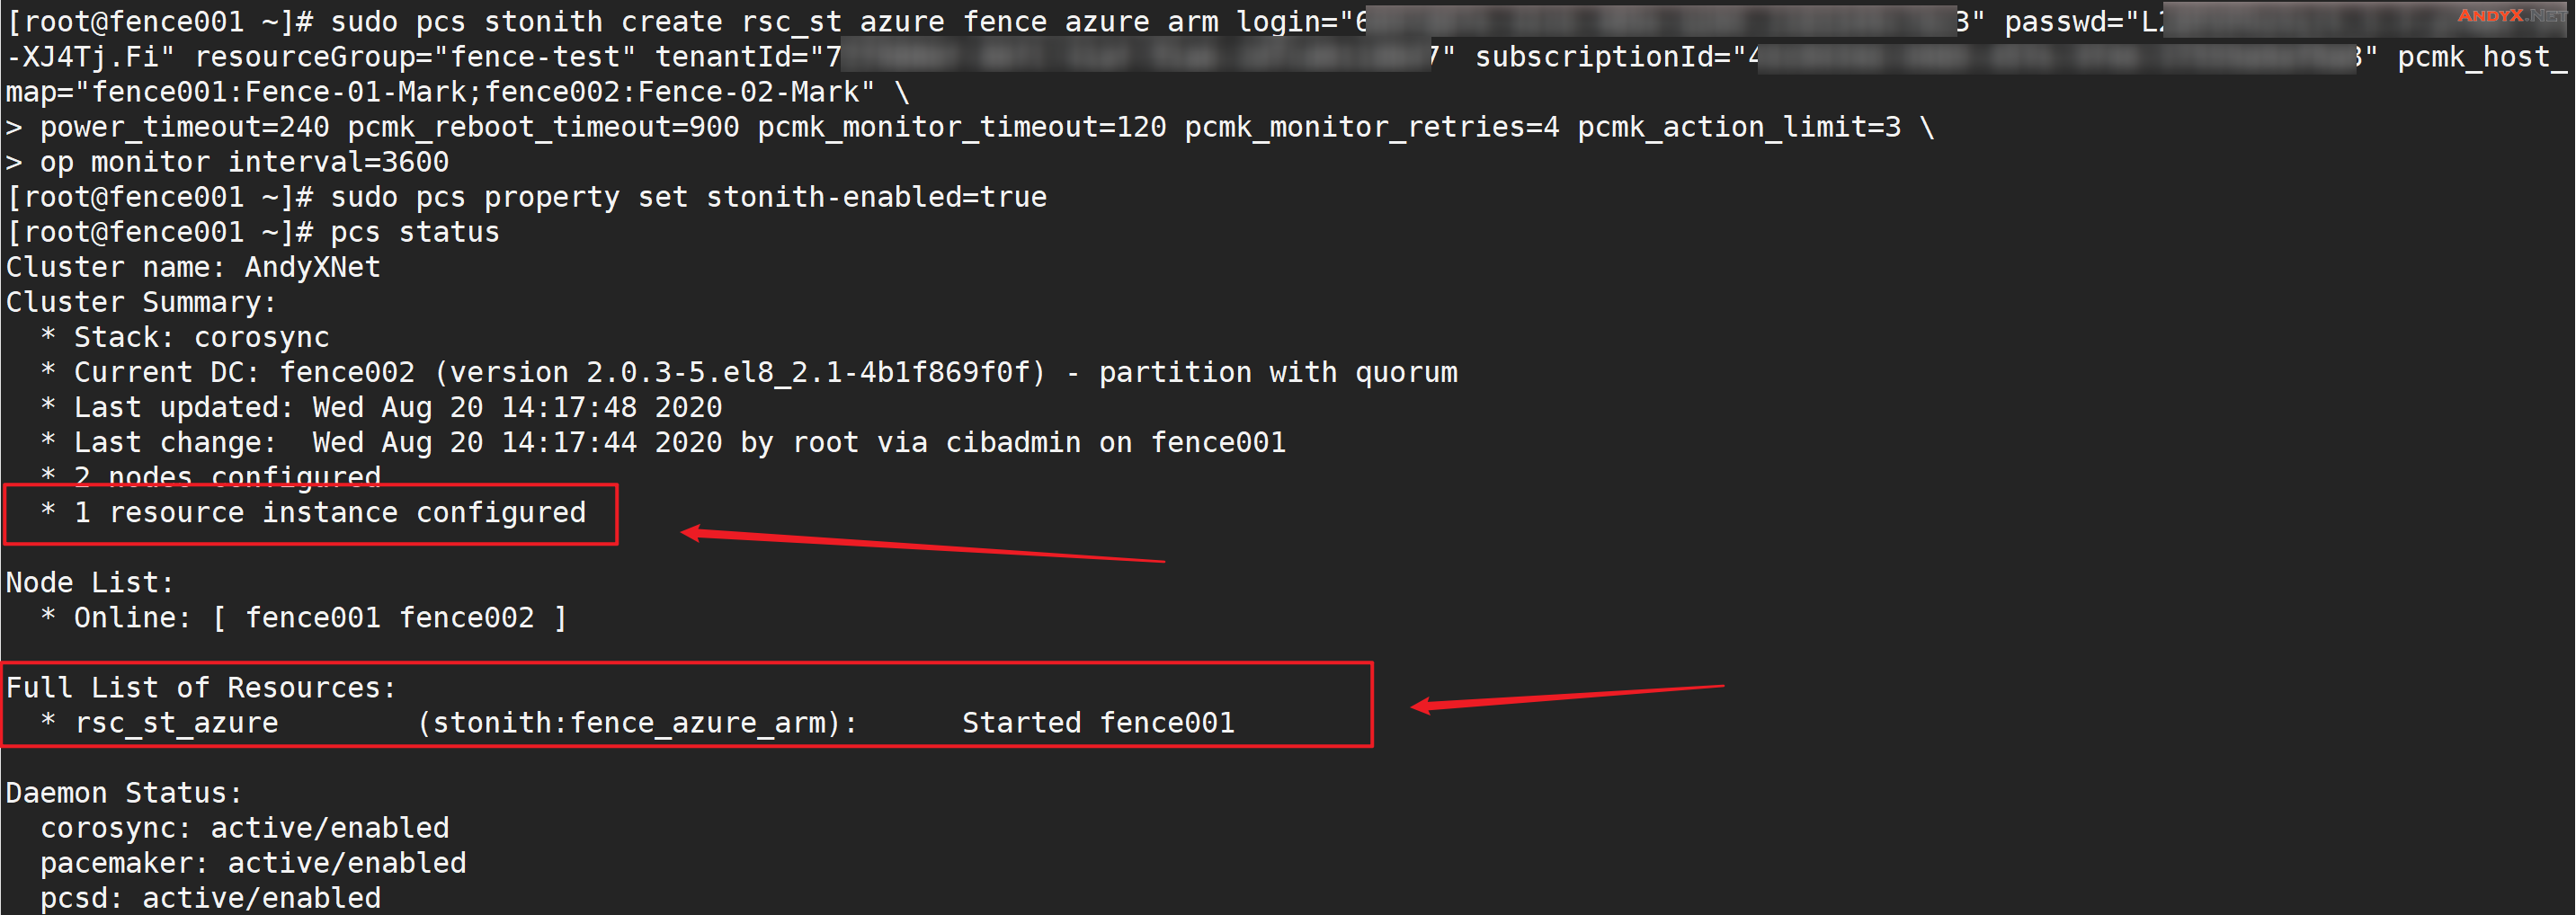
2. 启用 STONITH 设备, 并检查状态
pcs property set stonith-enabled=true
pcs status
六、其他Fence操作
1. 测试Failover
pcs stonith fence [Hosename]

#默认为触发node重启,如果要关闭node,使用--off参数
2.关闭并停用STONITH设备:
pcs property set stonith-enabled=false
pcs stonith delete rsc_st_azure
故障排查
症状:查询pcs状态显示以下报错
Cluster name: haha_cluster

WARNINGS:
No stonith devices and stonith-enabled is not false

Stack: corosync
Current DC: TEST002D-H (2) (version 1.1.22-1.el7-63d2d79005) - partition with quorum
Last updated: Tue Aug 18 13:27:11 2020
Last change: Mon Aug 17 23:04:03 2020 by root via admin on TEST001D-H

2 nodes configured
0 resource instances configured

Online: [ TEST001D-H (1) TEST002D-H (2) ]

No resources  <===

Node Attributes:
* Node TEST001D-H (1):
* Node TEST002D-H (2):

Migration Summary:
* Node TEST001D-H (1):
* Node TEST002D-H (2):

Fencing History:

PCSD Status:
  TEST002D-H: Online
  TEST001D-H: Online

Daemon Status:
  corosync: active/enabled
  pacemaker: active/enabled
  pcsd: active/enabled
检查/var/log/message 日志
Aug 17 12:54:40 andyxtestvm pengine[6201]:  notice: Calculated transition 413, saving inputs in /var/lib/pacemaker/pengine/pe-input-5.bz2
Aug 17 12:54:40 andyxtestvm crmd[6202]:  notice: Initiating stop operation rsc_st_azure_stop_0 on TEST001D-H
Aug 17 12:54:40 andyxtestvm crmd[6202]:  notice: Initiating start operation rsc_st_azure_start_0 locally on andyxtestvm-H
Aug 17 12:54:42 andyxtestvm fence_azure_arm: Failed: AdalError: Get Token request returned http error: 400 and server response: {"error":"unauthorized_client","error_description":"AADANDYXTEST: Application with identifier 'andyx-dev-aad-appreg-001' was not found in the directory 'c7d1a8f7-0546-4a0c-8cf5-xxxxxxxxxxx'. This can happen if the application has not been installed by the administrator of the tenant or consented to by any user in the tenant. You may have sent your authentication request to the wrong tenant.\r\nTrace ID: 6908e0b7-bfa1-4bb3-824f-xxxxxxxxxx\r\nCorrelation ID: 2f327684-6168-4ec7-a234-xxxxxxxxxx\r\nTimestamp: 2020-08-17 12:54:42Z","error_codes":[700016],"timestamp":"2020-08-17 12:54:42Z","trace_id":"6908e0b7-bfa1-4bb3-824f-xxxxxxxxxx","correlation_id":"2f327684-6168-4ec7-a234-xxxxxxxxxx","error_uri":"https://login.microsoftonline.com/error?code=700016"}
Aug 17 12:54:42 andyxtestvm fence_azure_arm: Please use '-h' for usage
Aug 17 12:54:42 andyxtestvm stonith-ng[6198]:  notice: fence_azure_arm_monitor_1:5107:stderr [ 2020-08-17 12:54:42,527 ERROR: Failed: AdalError: Get Token request returned http error: 400 and server response: {"error":"unauthorized_client","error_description":"AADANDYXTEST: Application with identifier 'andyx-dev-aad-appreg-001' was not found in the directory 'c7d1a8f7-0546-4a0c-8cf5-xxxxxxxxxxx'. This can happen if the application has not been installed by the administrator of the tenant or consented to by any user in the tenant.
从以上报错我们可以发现错误信息都指向了认证相关的环节,关键信息是:
"error":"unauthorized_client","error_description":"AADANDYXTEST: Application with identifier 'andyx-dev-aad-appreg-001' was not found in the directory 'c7d1a8f7-0546-4a0c-8cf5-xxxxxxxxxxx'.
问题根源:
配置stonith时添入了错误的Azure AD相关信息,需要验证Azure AD在Stonith中的配置(tenant ID, login ID, password)。
当重新配置stonith之后问题不在复现。
(END)
参考文献
文章撰写:AndyX,来自AndyX.Net。
文章遵循 CC 4.0 BY-SA 版权协议,若需转载本文,请标注来源与链接:原创内容AndyX.Net版权所有

